Selecting Data to Scrape
- 1. Capture Text / URLs / Email / Images
- 2. Capture portion of text (sub text)
- 3. Capture Text following a Heading
- 4. Capture HTML
- 5. Capture hidden fields ('click to display' fields)
- 6. Apply Regular Expressions
- 7. Capture More Content
- 8. Capture Text as File
- 9. Custom Data (page URL, page screenshot, date/time, text)
Interacting with Page
- 1. Input Text
- 2. Run Java Script on page
- 3. Select dropdown option
- 4. Open Popup and scrape data
- 5. Scroll page down to load contents
- 6. Reload / Go Back
- 7. Open Frame
- 8. Follow Links / Click
- 9. Scroll List
-
Using WebHarvy you can scrape text, URLs/email addresses and images from web pages. While in Config mode, as you move the mouse pointer over the page, the data items which can be captured are highlighted with yellow background. Click on any data element in the page which you intend to scrape. WebHarvy will display a Capture window. Even if an element is not highlighted when you hover the mouse pointer above it, you may click on the element to capture it

-
In the resulting Capture window displayed, click the 'Capture Text' button.

-
You can then specify a name for the data item to be scraped as shown below.

-
Once you click 'OK', WebHarvy will automatically identify all similar data elements in the page and will display a preview of captured data in the 'Captured Data Preview' pane as shown below.

-
Scrape URLs/Email
If you click on a link during configuration, then the 'Capture target URL' button in the Capture window displayed may be clicked to capture the URL pointed by the link. Select 'Capture email address' option in Capture window after clicking email links to capture email addresses.
-
Scrape Images
During configuration, when you click on an image, the 'Capture Image' button in the resulting Capture window can be clicked either to download the image or scrape its URL as shown below.

Scraping Images from HTML after applying RegEx
The 'Capture Image' option can also be used on the HTML of the selected content after applying Regular Expression to get the image URL. The following are the steps involved.
- 1. Click on the image or the content (in whose HTML the image URL is embedded)
- 2. In case required, click 'More Options' button and select 'Capture More Content' option multiple times to make sure that the HTML of the content contains the image URL.
- 3. Click 'More Options' button and select 'Capture HTML' option
- 4. Click 'More Options' button and select 'Apply Regular Expression' option
- 5. Apply the correct RegEx string so that the preview displays only the image URL
- 6. Click the 'Capture Image' button to download/capture the image whose URL is displayed in the preview area
Scrape Text
In similar way, you can capture more data items from the page.
In case the text which you need to extract always appear after a heading text, it is recommended to use the 'Capture following text' feature. This is helpful to extract data from product/listing details pages which does not have a consistent layout across listings.
Scrape portion of text (sub text)
Sometimes you may require that only a portion of the text displayed in the capture preview is scraped. For this, select (highlight) the required portion of text to be scraped as shown below, before clicking the 'Capture Text' button.
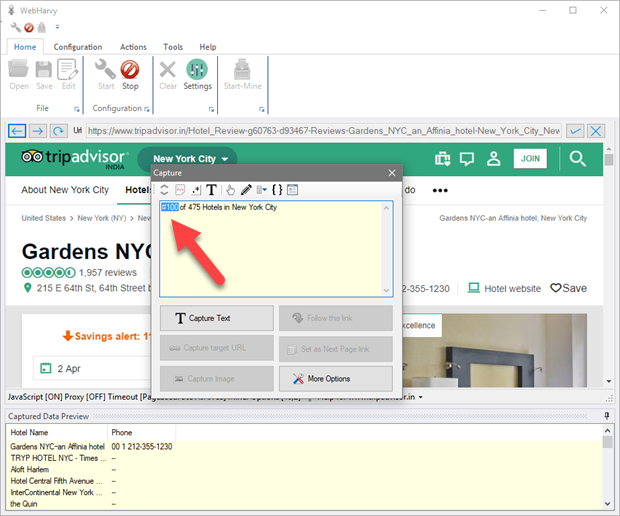
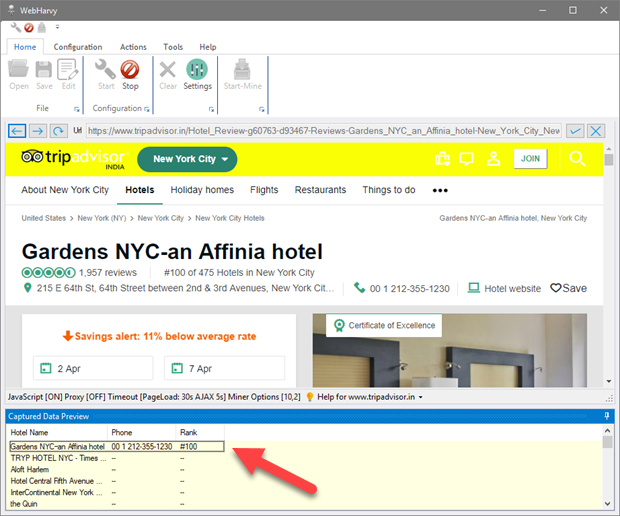
Click 'Capture Text' button after selecting the required portion of text. Only the selected portion will be captured as shown in the preview pane below.
While following this method the accuracy of sub-text selection will improve if there is a delimiting symbol (Ex. punctuation mark, currency symbol, special character, new line etc.) just before and after the selected text. It is recommended that you do not include this delimiting character in the selection.
 Watch video : Selecting required
portion of text before clicking 'Capture Text'
Scrape Text following a Heading
Whenever the data which you need to extract occurs (always) after a heading text, it is recommended to use the 'Capture following text' option provided in the Capture window. This ensures that the data is captured irrespective of its location within the page.
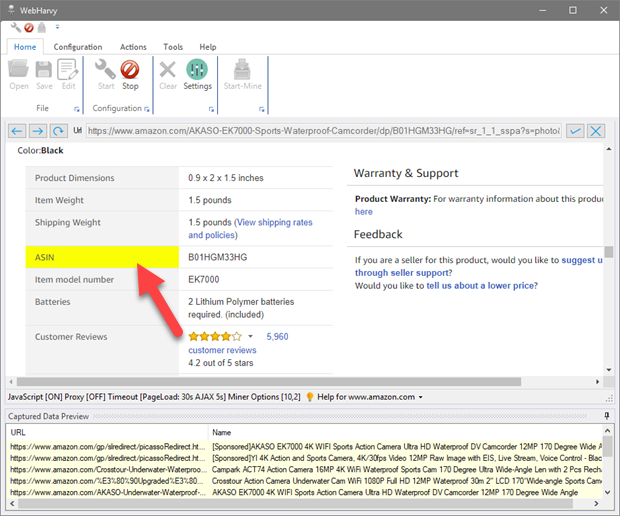
In the following example (www.amazon.com) in order to capture the text which comes after the heading 'ASIN', click on the heading 'ASIN' while in Config mode.
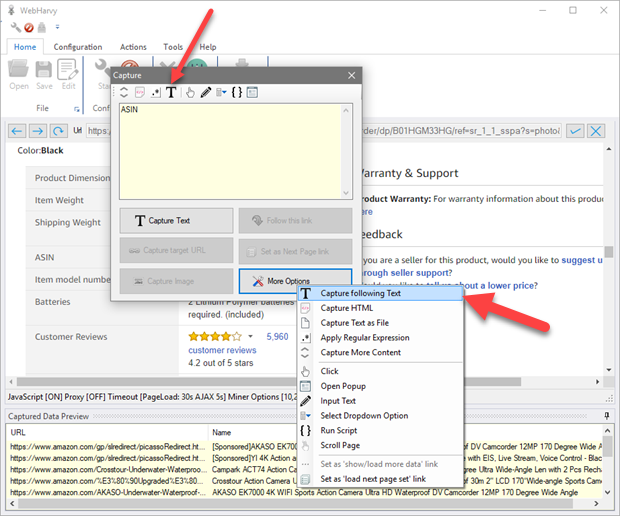
In the capture window displayed, click 'More Options' button and select the 'Capture following Text' option.
The text following the selected heading will be displayed in the Capture window preview area.
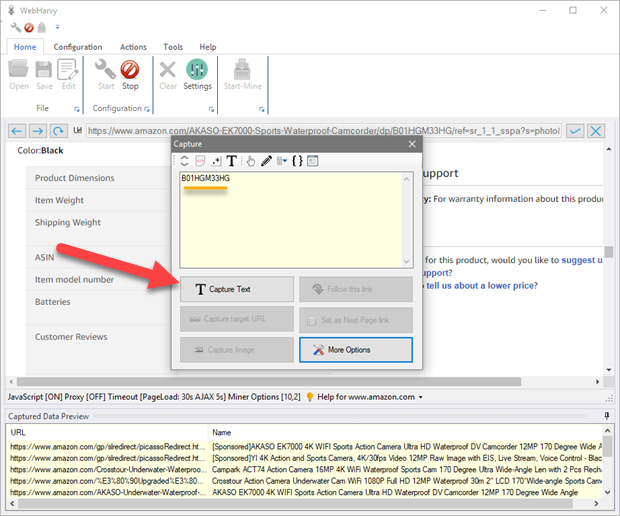
Click the 'Capture Text' button to capture it.
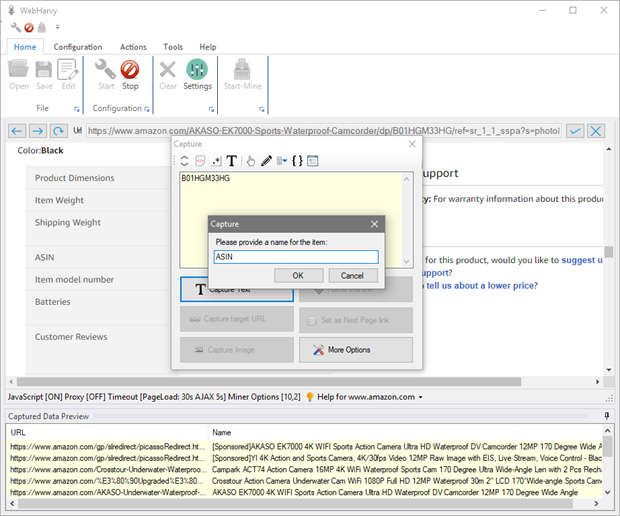
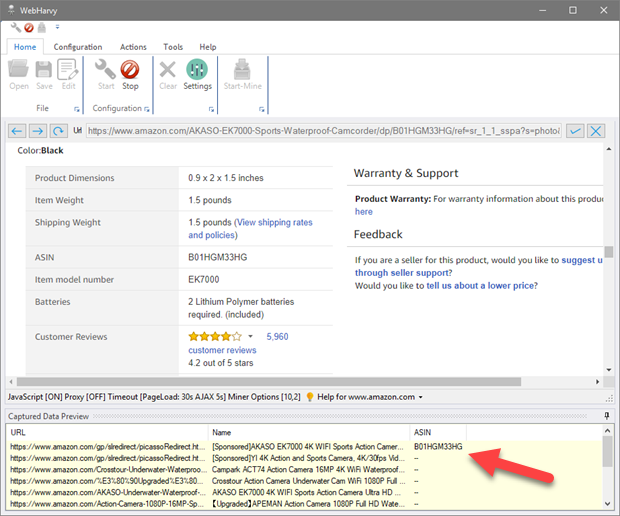
As shown below the ASIN code is correctly captured and displayed in preview pane.
 Watch video : Capture text
following a heading
Scrape HTML of selected item
To scrape the HTML code of a selected item in a web page, select the 'Capture HTML' option after clicking the 'More Options' button in Capture window.
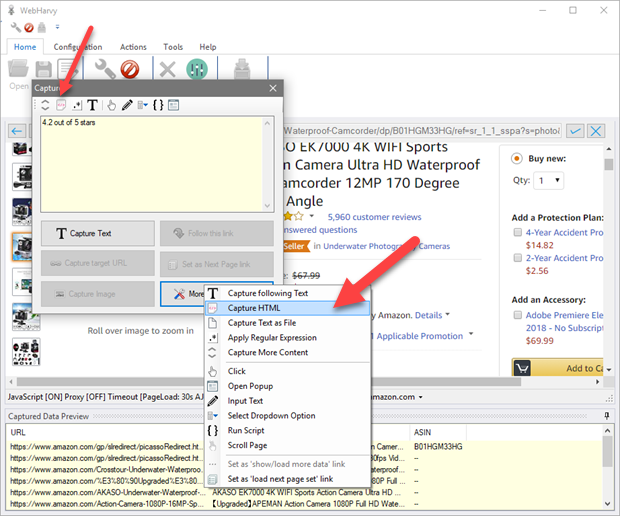 Double click on the 'Capture HTML' toolbar button to capture the entire page
HTML.
HTML code of the selected element will be displayed in the Capture window preview area. Click the main 'Capture HTML' button to capture the HTML of the selected element as shown below.
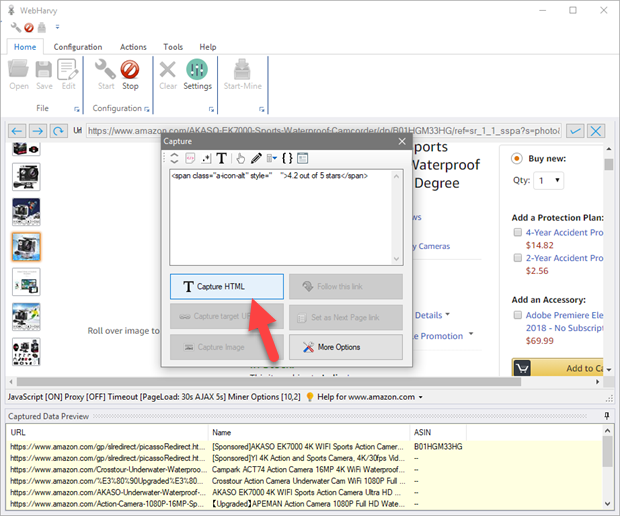
In case you need to extract only a portion of the displayed HTML, you may select and highlight the required portion before clicking the 'Capture HTML' button. (Refer Scraping Sub Text). You may also apply regular expressions to selectively capture data from the HTML source code of the element.
Scrape hidden fields ('Click to display' fields)
There are many web pages where you need to click an item in order to display the text behind it. For example, in the following yellow pages web page, the phone number will be displayed only when you click the 'Show number' button.
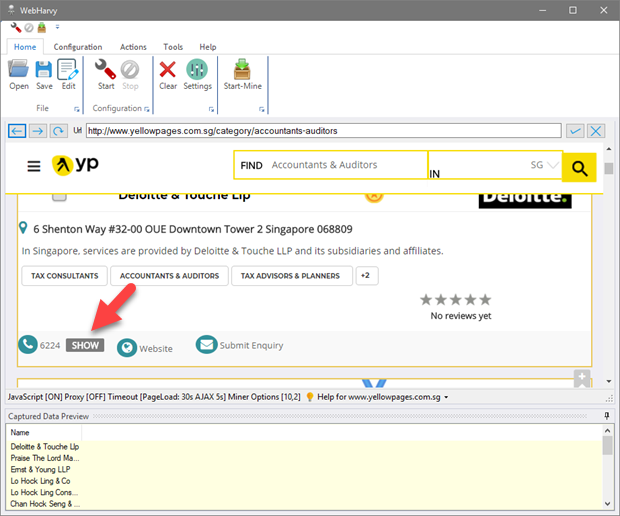
So before capturing data from the page (while in Config mode), you need to click and display phone numbers of all listings. The same process must be repeated later while mining data. For this, click on the first hidden field and in the resulting Capture window displayed, click 'More Options' button and select the 'Click' option as shown below.
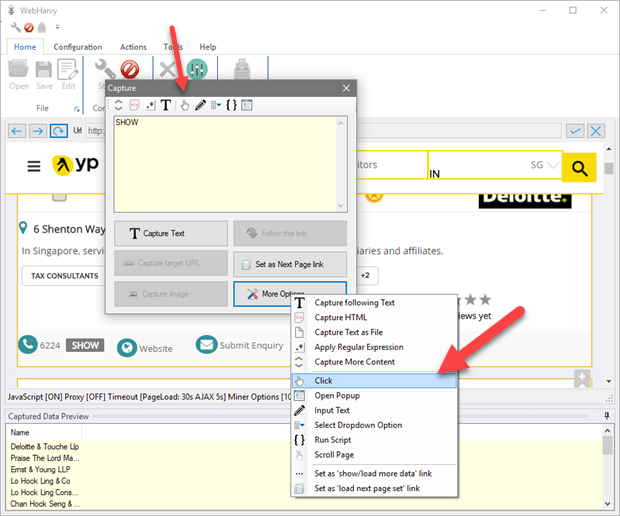
Wait for a few seconds and you will see that all hidden fields are automatically clicked and displayed. Now you may click and extract the phone numbers as if they are normal text fields in the page.
Watch video : Capture hidden 'click to display' fieldsScrape using Regular Expressions
WebHarvy allows you to apply Regular Expressions on the selected text (or HTML) before scraping it. You may apply Regular Expressions on Text or HTML.
WebHarvy RegEx TutorialRegular expressions can be applied by clicking the 'More Options' button and then selecting the 'Apply Regular Expression' option as shown below.
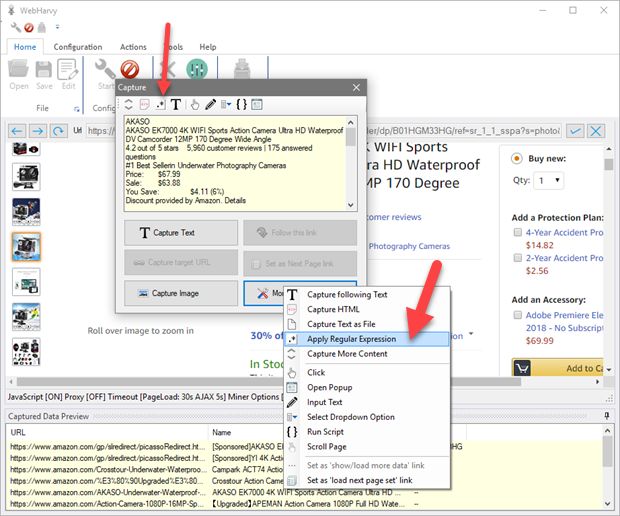
You may then specify the RegEx string. WebHarvy will extract only those portion(s) of the main text which matches the group(s) specified in the RegEx string.
If you enable the 'Match Multiple Items' option, all matching strings will be selected. Else, only the first matching string will be selected for extraction.
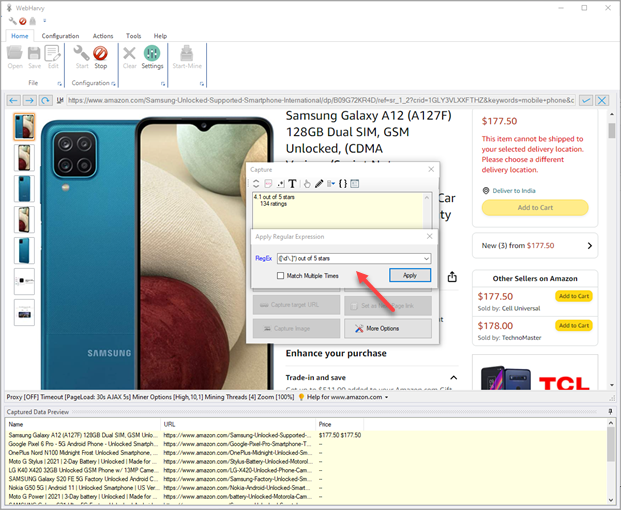
Click Apply. The resulting text after applying the Regular Expression will be displayed in the Capture window text box. Click the main 'Capture Text' button to capture it. The result after matching the RegEx string will be extracted as shown below.
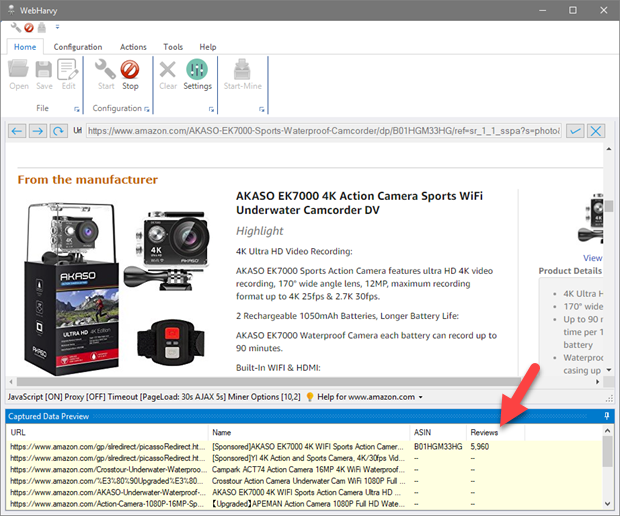 Watch video : How to use Regular Expressions with WebHarvy ?
Scrape More Content
Apply the 'Capture More Content' option after clicking the 'More Options' button in Capture window to scrape more content than what is currently displayed in the Capture window preview area. When you apply this option WebHarvy will capture the parent element of the currently selected element. You may apply this option multiple times till the Capture window preview area displays the required content.

This option comes in handy while capturing articles or blog posts. During Config, click on the first paragraph of the article (or blog) and when the Capture window is displayed, click the 'Capture More Content' option until the whole article text is displayed in the preview area. Then click the 'Capture Text' button to capture it.
Scrape Text as File
The 'Capture Text as File' option under 'More Options' in the Capture window will let you scrape the selected text (text displayed in Capture window preview area) as a file. While mining, the text will be downloaded as a file to the specified folder. Like the 'Scrape more content' feature, this feature is helpful while extracting articles or blog posts.

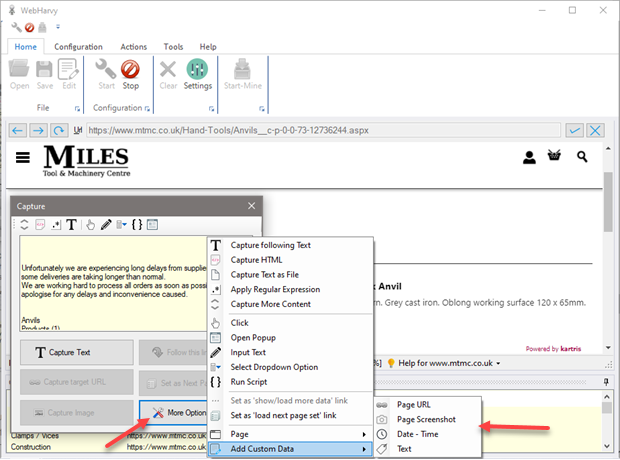
Add Custom Data
The following custom data fields can be added by clicking anywhere on the page during configuration and by selecting the 'Add Custom Data' option under 'More Options' in Capture window.
| Page URL | Capture URL/address of currently loaded page |
| Page Screenshot | Capture screenshot of currently loaded page |
| Date - Time | Capture current date and time |
| Text | User provided text |
Input Text
The 'Input Text' option under 'More Options' in the Capture window allows you to enter text in input fields on web pages. During configuration, click on the input field/text box where you want to enter text and then select 'More Options' > 'Input Text', from the resulting Capture window. Type in the string which you need to input and click OK, the specified string will be placed inside the text box. The same action will be automatically repeated during the mining stage.

Run Java Script on page
The 'Run Script' option under 'More Options' in the Capture window allows you to run Java Script code on the currently loaded page. For this, click anywhere on the page and select More Options > Run Script from the Capture window. In the resulting window you can enter the Java Script code which you need to run and click OK.


The code will be run at once for you to see the results, and will also be run automatically during the mining phase.
Select dropdown/listbox/combobox option
During configuration, by clicking on a list/dropdown box and by selecting 'More Options' > 'Select Dropdown Option', you can select any value from a list/dropdown box.

As shown below, in the resulting window you can select the required list option and it will be selected automatically during mining.

Open Popup and scrape data
In some web pages, you will have to click on each listing/link to open a popup or populate a view within the same page with the corresponding details. Data related to each listing should be extracted after clicking its title link/button. This is different compared to 'Following a link' where a new page is loaded which displays the required data. Here, a popup window / view within the same page is updated with results/data. In such cases the 'Open Popup' option under 'More Options' in Capture window can be used, as shown in the following example.

Click the title/link of the first listing and select 'More Options' > 'Open Popup'. This will open the popup window or update an area in the same page with the required data. Now you can click and select the data displayed in normal fashion. Kindly note that Preview will be updated with details of first listing only. During mining, WebHarvy will click each listing link one-by-one and get resulting data.
Watch video : Extracting data from popups
Scroll page down slowly so that content is loaded
Sometimes a web page load contents further down the page (like images, lazy loading) only if the page is scrolled down. In such cases the 'Scroll Down' option under 'More Options > Page' in Capture window can be used. Click anywhere on the page during configuration and select More Options > Page > Scroll Down

Reload / Go back
Next to 'Scroll Down' option in Page sub menu of More Options menu in Capture window (see above image), you will find options to reload the currently loaded page and also to go back to previously loaded page.
The reload option is helpful in cases where a page is not correctly loaded first time when a link is followed. In such cases reload helps to ensure that the page is correctly loaded.
Open Frame
Sometimes the data which you need to select for extraction occur within a frame inside the page (iframe). In such cases when you try to select data during configuration, the resulting Capture window will have all options disabled, other than the 'Open Frame' option.
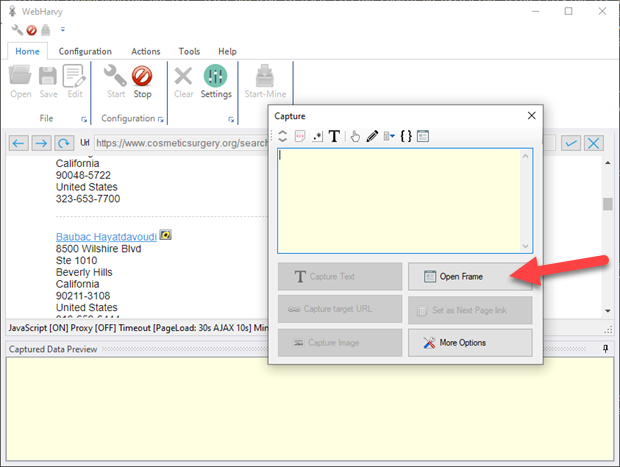
When you select the 'Open Frame' option, the frame contents will be loaded independently within WebHarvy's browser allowing you to proceed with data selection. You can then click and select the required data as you would normally do.
Scroll a list of items
To smoothly scroll down a list of items, click on the first item in the list and select More Options > Scroll List from the resulting Capture window.
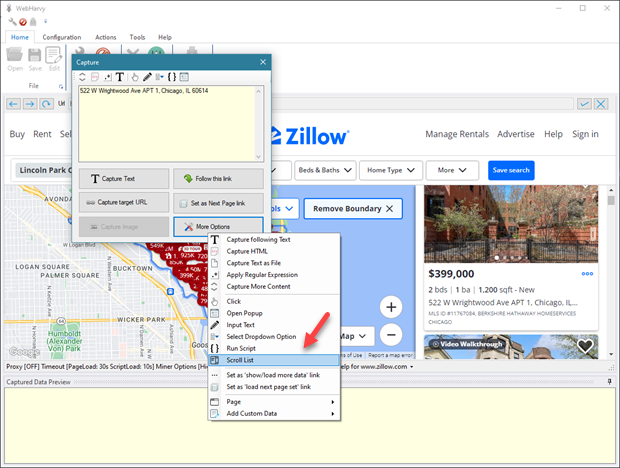
This option can be used on lists that load items completely only when they are scrolled down.
